Artemia Hatchery Deluxe Artemia Hatchery Deluxe

Aquainfo.dk

Artemia Hatchery Deluxe

An improved version of the Artemia hatchery.

Se galleri
The main ingredient is still the Coke bottle, but you also need to buy wood, hinges, handles, sockets, and switches, among other things.

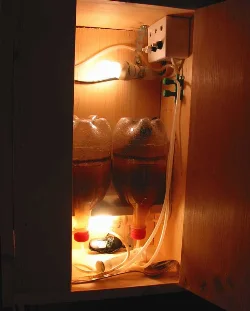
The cheap model of the Artemia hatchery has certain disadvantages that any serious breeder will eventually encounter. Firstly, it tips over easily as the center of gravity is high, and secondly, it can produce both noise and odor issues in the fish room. In this significantly improved deluxe model, these disadvantages are totally eliminated, creating a much more stable and efficient way to hatch Artemia salina nauplii.

Concept and Advantages

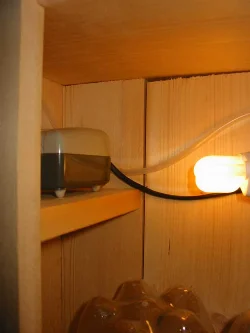
The basic concept is a closed cabinet with a built-in holder, air pump, and lighting. One of the primary advantages of this enclosed design is the ability to provide 24/7 lighting. This ensures a steady temperature (typically 25-28°C) and strong illumination, which triggers the metabolism of the cysts. This results in a significantly higher hatching rate and faster development from cyst to nauplius.

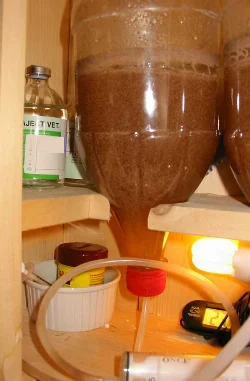
The system still utilizes the classic inverted 1.5L soda bottle with a cap, as described in the cheap model. Since the cabinet acts as the support, you can operate multiple bottles independently to ensure a continuous supply of live food.

Construction and Aeration

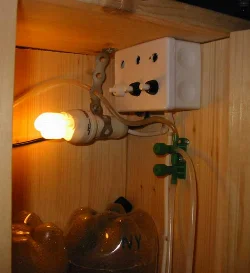
An air hose runs from the built-in air pump to a manifold or branch connector placed above the water level to prevent backflow. From there, individual hoses are led to each bottle through the cap. This ensures vigorous circulation, keeping the eggs in constant motion and preventing them from settling in dead zones.

Harvesting and Maintenance

When it comes to harvesting, the deluxe model is superior. By turning off the upper light and activating a lower light source, the phototactic nauplii gather at the bottom of the bottle while empty shells float to the surface.

Note: When cleaning the bottles, you can disconnect the air hose from the manifold. Be careful not to drop the hose below the water line, as the water will drain out via siphoning and cause a mess.

Faktatabel

Quick Stats
Manufacturer

Hjemmebygget

Retailer

Diverse byggemarkeder

Price

250.00

Price 2

400.00

Power Consumption

ca. 10W

Flow Rate

Justerbar via luftpumpe

Length

0.4 mm (nauplier)

Materials

Pine wood (e.g., for shelves)
two small hinges
one door handle
two E14 sockets
two 4W energy-saving bulbs
three switches
one junction box
2 large Coke bottles
air tubing
screws

Tools

saw
power drill or screwdriver
hobby knife
drill
5.5mm drill bit
52mm hole saw
sandpaper

Billedgalleri

Deluxe hatchery for live *Artemia salina*

Deluxe hatchery for live *Artemia salina*

The main ingredient is still the Coke bottle, but you also need to buy wood, hinges, handles, sockets, and switches, among other things.

The main ingredient is still the Coke bottle, but you also need to buy wood, hinges, handles, sockets, and switches, among other things.

Here you can see the air pump which is built-in and controlled by a switch panel in the cabinet.

Here you can see the air pump which is built-in and controlled by a switch panel in the cabinet.

And here is the switch panel, as well as the upper socket with a 4W energy-saving bulb. The idea is to turn off the upper bulb and turn on the lower one when harvesting.

And here is the switch panel, as well as the upper socket with a 4W energy-saving bulb. The idea is to turn off the upper bulb and turn on the lower one when harvesting.

Here you can see the bottom of the cabinet and the lower socket, also with a 4W energy-saving bulb. Strictly speaking, you can do without the upper bulb and socket.

Here you can see the bottom of the cabinet and the lower socket, also with a 4W energy-saving bulb. Strictly speaking, you can do without the upper bulb and socket.

Comments

Diskussion
Vi gennemser alle kommentarer.
R
Rasmus.
2012-01-13 17:48:30
Fed guide! Har du et link til den afbryderbox du har brugt? Kan ikke rigtigt finde noget tilsvarende :)
Aquainfo
Afbryder boksen er "hjemmelavet". Det er en almindelig samledåse jeg har boret huller i og monteret 3 afbrydere. Alle delene skulle være til at få de fleste steder.
T
tim
2006-09-27 17:01:02
jeg forstår slet ikke noget af hvordan man opbygger den, det er alt for dårligt beskrevet og min mundruger får unger om 2-3 dage
Aquainfo
Deluxe modellen tager udgangspunkt i at man har prøvet den almindelige model, men ønsker noget der er pænere og kan gemmes lidt mere af vejen. Jeg synes du skal prøve at kigge på den almindelige udgave, den er lidt mere udførligt beskrevet. Hvis der stadig er noget du er i tvivl om så læg en kommentar der.