Replacing membranes on LP-40 air pump Replacing membranes on LP-40 air pump

Aquainfo.dk

Replacing membranes on LP-40 air pump

Maintaining the LP-40: Replacing worn diaphragms

Se galleri
Begin by removing the end cover of the pump.

The most common point of failure in any air pump is the rubber membrane or diaphragm. This component acts as a bell driven back and forth by an internal coil and shaft. Due to the constant mechanical stress and deformation, the rubber eventually loses its elasticity and cracks.

Impact on Large Systems

For a high-capacity pump like the Clear Seal LP-40, a diaphragm failure is particularly critical. Since these pumps often power entire rack systems—driving as many as 11 tanks at once in my setup—a failure results in a complete loss of filtration across all connected aquariums.

Sourcing Spare Parts

Finding replacement kits for the LP-40 can be challenging, as they are only available at specialized retailers. A set of two replacement membranes typically costs around 199 DKK. While expensive, replacing the membranes is far more cost-effective than purchasing a new unit.
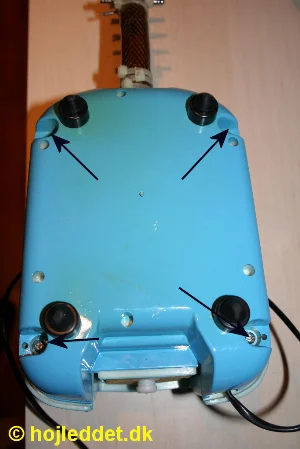
Repair Procedure

The repair is a straightforward DIY task requiring only basic tools like a Phillips screwdriver and a small wrench. The process includes: *Disassembly:** Removing the end cover and bottom plate. *Inspection:** Opening the internal diaphragm covers to locate the rupture. *Installation:** Unbolting the old diaphragm and carefully sandwiching the new one between the support plates, ensuring all alignment pins are seated correctly. *Reassembly:** Bolting the units back together and testing for airtight seals.

Regular inspection of the membranes can prevent unexpected failures and ensure the longevity of your central air system.

Faktatabel

Quick Stats
Manufacturer

Clear Seal

Retailer

Cichlidecentret

Price

199.00

Price 2

0.00

Power Consumption

N/A

Flow Rate

N/A

Materials

Diaphragm kit, 2 pcs.

Tools

Phillips screwdriver, wrench

Billedgalleri

Comparison of the new and old membranes; the old one remains in the holder.

Comparison of the new and old membranes; the old one remains in the holder.

Begin by removing the end cover of the pump.

Begin by removing the end cover of the pump.

The end cover has been removed.

The end cover has been removed.

Turn the pump upside down and remove the four marked screws.

Turn the pump upside down and remove the four marked screws.

The base plate is removed. Diaphragms at both ends are mounted identically.

The base plate is removed. Diaphragms at both ends are mounted identically.

The diaphragm is located behind this protective cover.

The diaphragm is located behind this protective cover.

Once the cover is removed, the condition of the diaphragm can be inspected.

Once the cover is removed, the condition of the diaphragm can be inspected.

The tear in the old diaphragm is clearly visible. Loosen the nut to release it.

The tear in the old diaphragm is clearly visible. Loosen the nut to release it.

The two support plates that sandwich the diaphragm.

The two support plates that sandwich the diaphragm.

The first plate is inserted through the diaphragm.

The first plate is inserted through the diaphragm.

The second plate is placed on top, ensuring the pins align.

The second plate is placed on top, ensuring the pins align.

Repeat the process for the other end and then fully reassemble the pump.

Repeat the process for the other end and then fully reassemble the pump.

Comments

Diskussion
Vi gennemser alle kommentarer.
J
jens@jakhandel.com
2008-12-13 18:24:15
Hvor kan man købe denne pumpe?
Aquainfo
Den kan købes hos Cichlide centret. Der findes også større modeller.